Making Your Power BI Teams More Analytics – Static Analysis for Reports
In my last article, I demonstrated how to set up an Azure DevOps pipeline that detects changes in Power BI reports and publishes the PBIP files as artifacts within the pipeline (not to a workspace). Now, with these artifacts available, we can trigger additional pipelines to analyze, monitor, and review our Power BI reports and semantic models.
 Figure 1 – High-level Diagram of analyzing reports with PBI Inspector and storing results
As shown in Figure 1, we’ll walk through two key steps:
- Analyzing reports with PBI Inspector – PBI Inspector, developed by Nat Van Gulck, examines the report.json file (which defines a Power BI report’s structure and behavior) for issues based on predefined rules. It offers both a User Interface and a Command Line Interface (CLI); we’ll use the CLI in our pipeline. I’ve customized a ruleset to align with my preferences. You can view an example HTML file outline these rules.
- Storing the analysis results – To track improvements over time, we need a place to store our results, aggregate analyses, and generate metrics. But where? This article follows a “choose your own adventure” approach: depending on your environment, you can store results in Git, SharePoint, or OneLake. I’ll provide setup guides for each option, along with their pros and cons.
Key Azure Terms
Before configuring storage, let’s clarify some Azure terminology used in this guide:
- Service Principal – An identity used by applications or automation tools to securely access Azure resources without user interaction (similar to a service account).
- Client Secret – A password-like credential paired with a Service Principal to authenticate and access Microsoft services. It must be stored securely and updated periodically.
- App Registration – The process of creating an identity for an application in Azure Active Directory (AAD)/Entra to enable authentication and resource access via APIs.
- Variable Group – A centralized collection of variables in Azure DevOps that can be shared across pipelines, useful for managing configurations and securing sensitive values.
- Pipeline Trigger – Just like our first pipeline runs on a Git commit, we can trigger another pipeline when a new artifact is created.
Jargon aside, let’s choose our adventure! This table of contents will let you skip to the platform you’d like to save PBI Inspector’s results.
Choose Your Adventure 🗺️
The Git Away
Pros
- Storage – The simplest way to store results. This is my default approach in restricted environments where Fabric is unavailable.
Cons
- Extraction - Retrieving results via the Azure DevOps API is slower due to API limitations.
- Performance - As the number of stored results grows, the process may slow down because each set needs to be committed to the repository. You must also commit to the latest HEAD to avoid conflicts, especially if multiple pipelines push changes simultaneously.
Prerequisites
- You must have Project Administrator or Build Administrator rights for the Azure DevOps project.
Steps:
1. Create Repository
- Set up a separate repository to store analysis results. Create a repository named pbi-test-results using the at this link.
2. Create Personal Access Token
- You’ll need a Personal Access Token (PAT) to authenticate and commit results. Follow these instructions to create a PAT with the following settings:
- Name: MYPBITMA Token
- Permissions: Read & Write access to the Code section
- Expiration: Set a custom expiration date one year from today
Tip: Schedule a reminder 11 months from now to extend your PAT before expiration.
- Please copy the generated token and save it temporarily (e.g., in Notepad). Once you leave the page, the token cannot be recovered.
 Figure 2 – Creating Personal Access Token
3. Get the PBIP-CI Pipeline ID
When you created the pipeline in the previous post, it generated a unique identifier within your project. We’ll need this identifier so our other pipeline can monitor for published artifacts.
- Navigate to the Pipeline page in your Azure DevOps project.
 Figure 3 – Navigate to Pipelines Page
 - Select the PBIP-CI pipeline.
 Figure 4 – Select PBIP-CI pipeline
 - Copy the definitionId (a numeric value) from the browser URL and save it for later (e.g., in Notepad).
 Figure 5 – Copy Pipeline ID
4. Set up the Variable Group
- In your Azure DevOps project, navigate to the Pipelines->Library section.
 Figure 6 – Select Library
 Select the “Add Variable Group” button.
 Figure 7 – Select + Variable Group
Create a variable group called “MYPBITMA” and create the following variables:
- GIT_PAT – This the personal access token you generated in prior steps. Make sure the lock icon is closed, so the GIT_PAT is encrypted.
- UPSTREAM_PIPELINE_ID – This the pipeline ID copied in the prior steps.
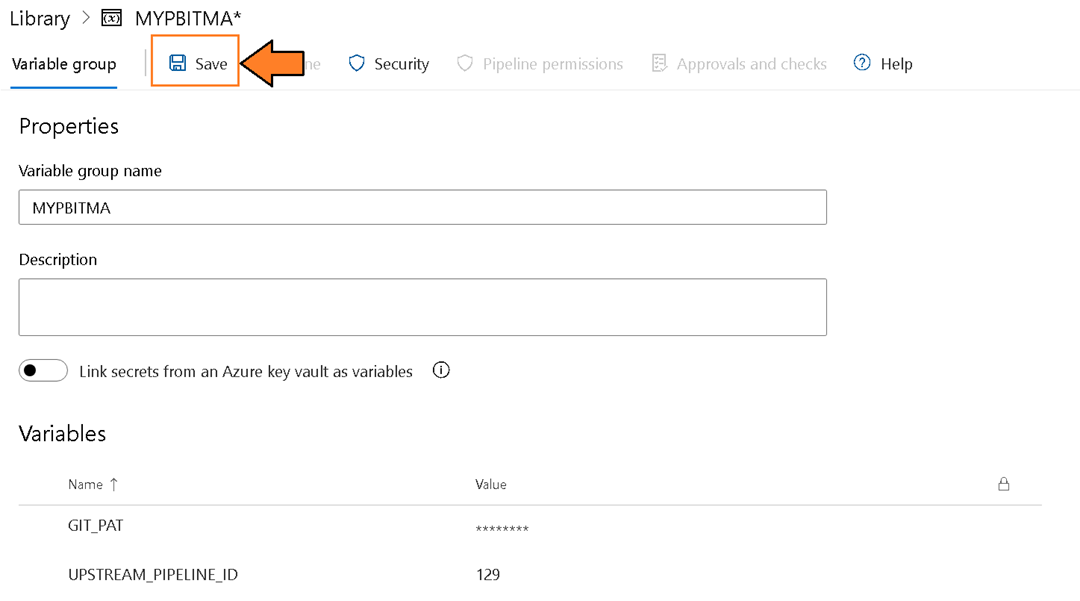 Figure 8 – Save Variable Group
5. Import Repository
- Navigate to Repos, click the breadcrumb menu dropdown (chevron), and select Import.
 Figure 9 – Import Repository
 - In the “Import a Git repository” window, enter
https://github.com/kerski/pbi-teams-more-analytic-supportin the Clone URL field, then click Import. Figure 10 – Import a Git repository Once the Import button is selected, the import process will begin and could take a few minutes.
  Figure 11 – Example of importing Git repository from GitHub into Azure DevOps
Once completed you’ll see the repository imported.
6. Setup Pipeline
Now we can set up the pipeline to run in Azure DevOps when artifacts are published.
- Navigate to the Pipelines screen.
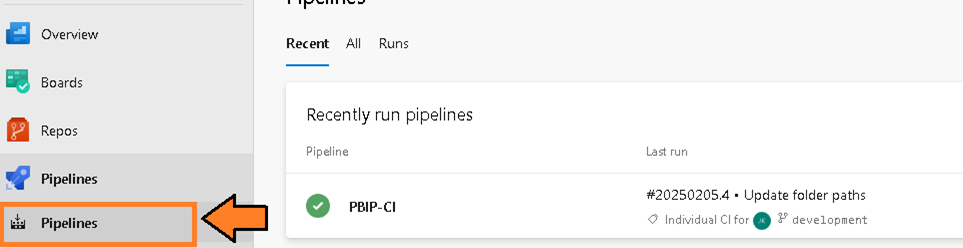 Figure 12 – Navigate to the Pipelines screen
 - Then select the “New Pipeline” button.
 Figure 13 – Select New Pipeline Button
 - You will be presented with the question “Where is your code?”. Select the Azure Repos Git option.
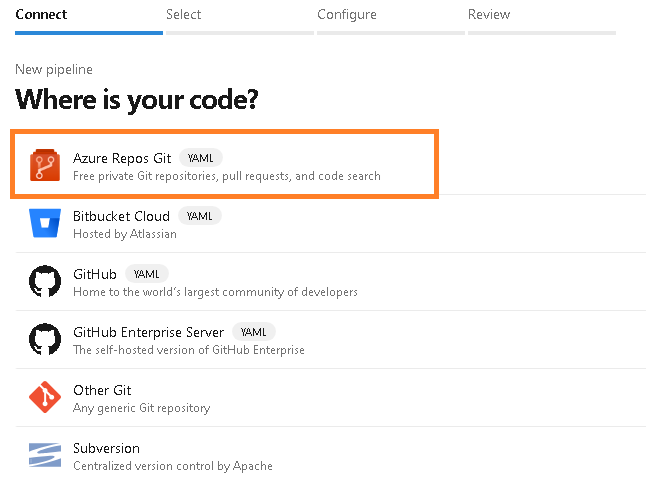 Figure 14 – Select the Azure Repos Git option
 - You will be prompted to select a repository. Select the repository name “pbi-teams-more-analytic support”.
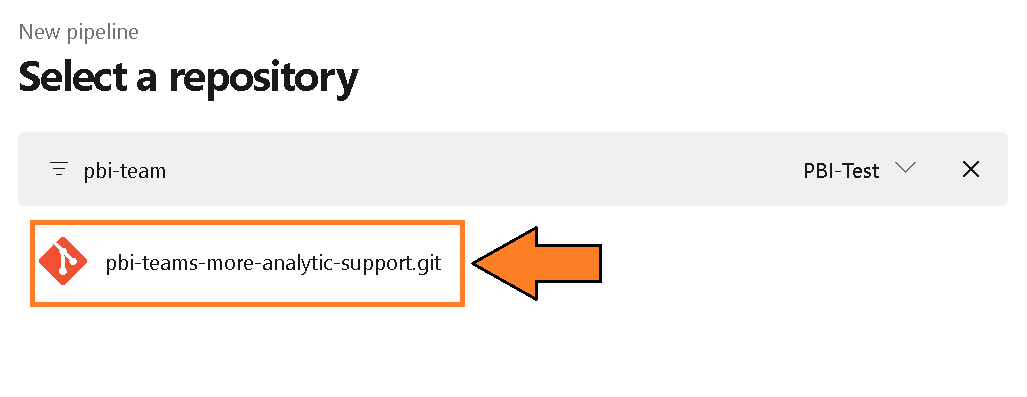 Figure 15 – Select a repository
 - You will be prompted to configure your pipeline. Choose the “Existing Azure Pipelines YAML file” option.
 Figure 16 – Configure your pipeline
 - From the “Select an existing YAML file” select the file named “pbi-inspector-git.yml”
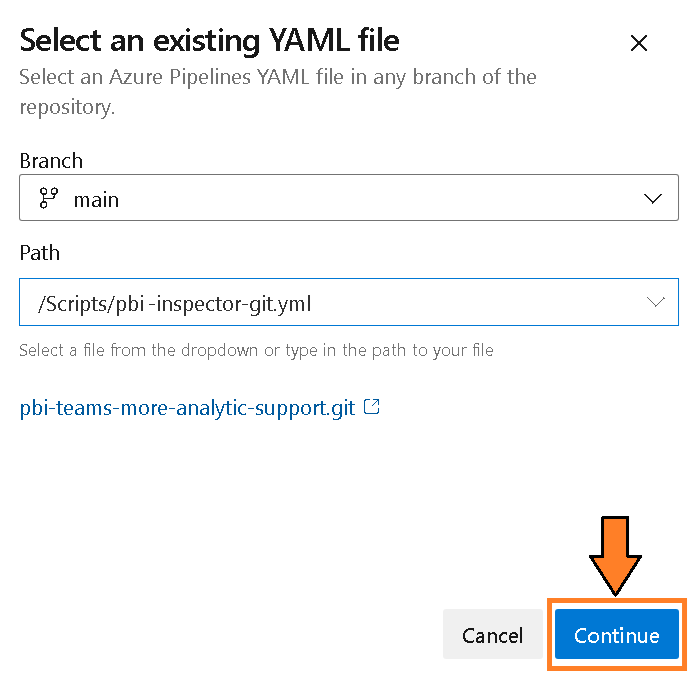 Figure 17 – Select /Scripts/pbi-insepctor-git.yml
 - Update the project names (line 10 and 33) to reference the project name.
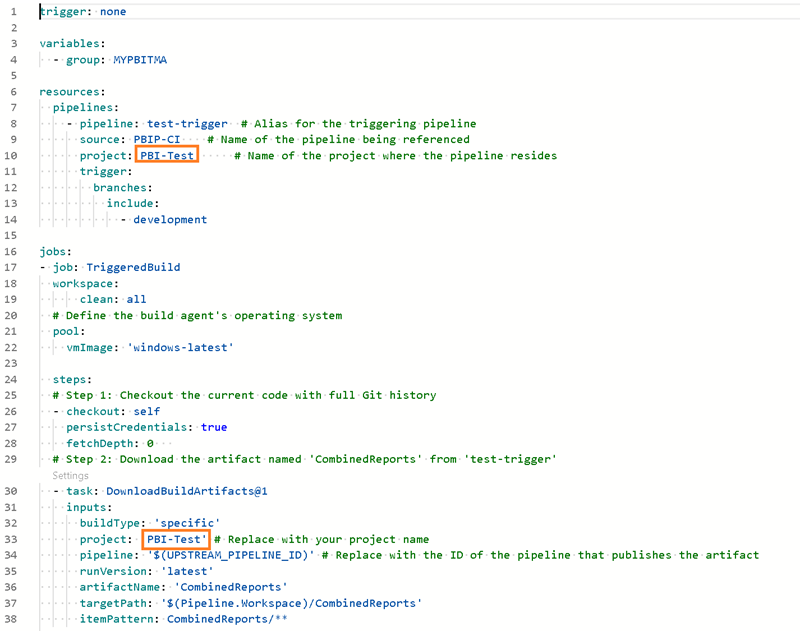 Figure 18 – Update project references
 - Then select the “Run” button and this will kick-off the pipeline. Figure 19 – Select “Run” button
- You will be redirected to the pipeline screen and prompted to verify permissions. This is required because the variable group is a resource that needs explicit access granted to the pipeline. This security rule (a good one) prevents unintended access to variables in the group. Click View to proceed.
 Figure 20 – Select the “View” button
 - You will be asked to permit the pipeline to access the variable group you created in the prior steps. Select the “Permit” button.
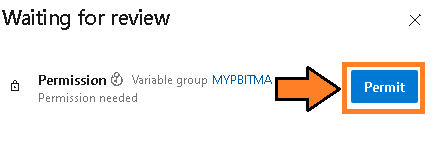 Figure 21 – Select the “Permit” button
 - You may be prompted again to permit. Select the “Permit” button.
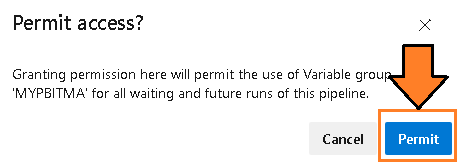 Figure 22 – Select the “Permit” button again
 - This will officially kick off the pipeline and it will access the last published packages from the PBIP-CI pipeline.
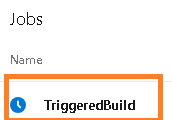 Figure 23 – Pipeline trigger
 - Once the pipeline completes, verify that there are no errors. Then, check the pbi-test-results repository to confirm that PBI Inspector’s analysis has been saved to Git.
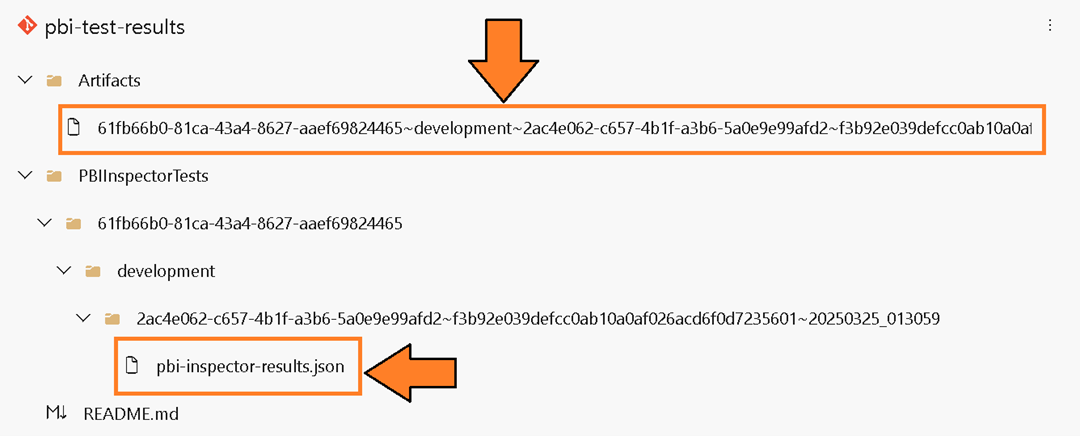 Figure 24 – Example of files save to Git
 - I would recommend renaming the pipeline from the default to “pbi-inspector”. Instructions for renaming a pipeline can be followed at this link.
The SharePoint Saga
Pros:
- Storage – Easy to manage, with built-in security and archiving features. SharePoint supports extensive file storage.
- Extraction – Easier to extract results compared to Git. SharePoint has native connectors, making extraction more straightforward.
Cons:
- Setup - Due to the deprecation of App Only authentication, configuring a service principal to save results via PowerShell is complex. In some environments, administrators may need to assist due to separation of duties.
Prerequisites:
- Site Collection Administrator rights on a SharePoint site to grant the service principal access to SharePoint content.
- Permissions to create service principals in the Azure tenant, requiring Application.ReadWrite.All permissions in Microsoft Entra.
- PowerShell Core installed.
Steps:
1. Setup SharePoint for Service Principal Usage
This is probably the most complex part of the setup, but this is the world we live in with SharePoint, so here we go:
- Create or use an existing SharePoint site – If you already have a team site and are the Site Collection Administrator, use it. Otherwise, create a new site and ensure you have admin rights. Instructions for creating a site can be found at this link.
- Create a document library called “pbi-test-results” – Instructions for creating a document library can be found at this link.
- Enable PnP.PowerShell for SharePoint authentication – This step can be tedious, but PnP.PowerShell is the best module for interacting with SharePoint. Rather than reproducing the steps, I recommend referring to the official documentation at this link. Ultimately, when you connect with PnP.PowerShell, you will use a command like this:
Connect-PnPOnline -Interactive -Url $siteUrl -ClientId 1exxb24z-7597-49c2-867d-2e9bf8c7bxx7 - Create another service principal – This one will specifically interface with SharePoint via the Azure DevOps pipeline. This principal should have the Sites.Selected permission in both Microsoft Graph and SharePoint.
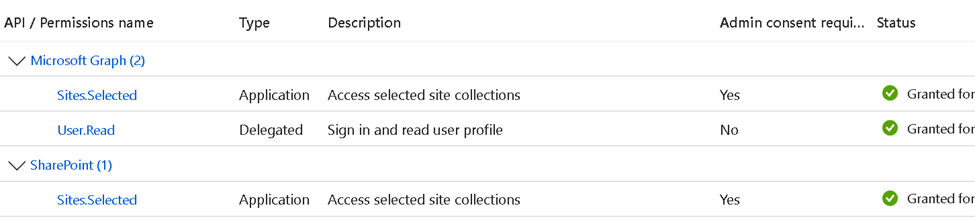 Figure 25 – API Permissions
 - Now we need to set up the certificate. Why a certificate instead of a client secret? The certificate is required to save content to SharePoint—those are the rules we have to follow.
# Variables $certName = "PnPServicePrincipalCert" $certPath = "./$certName.pfx" $certPassword = Read-Host -AsSecureString "Enter the password for the certificate (PFX)" # Create a self-signed certificate $cert = New-SelfSignedCertificate -Subject "CN=$certName" -KeySpec KeyExchange -KeyLength 2048 -KeyExportPolicy Exportable -CertStoreLocation "Cert:\CurrentUser\My" -NotAfter (Get-Date).AddYears(1) # Export the certificate (PFX contains both public and private keys) Export-PfxCertificate -Cert $cert -FilePath $certPath -Password (ConvertTo-SecureString -String $certPassword -Force -AsPlainText) # Export the public key (PEM format, for Azure) Export-Certificate -Cert $cert -FilePath "./$certName.cer" # Validate the certificate with the password try { $securePassword = ConvertTo-SecureString -String $certPassword -Force -AsPlainText $importedCert = Import-PfxCertificate -FilePath $certPath -CertStoreLocation "Cert:\CurrentUser\My" -Password $securePassword -ErrorAction Stop Write-Host "Certificate validation successful." } catch { Write-Host "Certificate validation failed: $_" } Write-Host "Certificate created and exported:" Write-Host "PFX: $certPath" Write-Host "CER: ./$($certName).cer" # Get the thumbprint of the newly created certificate $thumbprint = (Get-ChildItem -Path Cert:\CurrentUser\My | Where-Object { $_.Subject -eq "CN=$certName" }).Thumbprint Write-Host "Thumbprint: $thumbprint" # Import the certificate into the CurrentUser\My store $securePassword = ConvertTo-SecureString -String $certPassword -Force -AsPlainText Import-PfxCertificate -FilePath $certPath -CertStoreLocation "Cert:\CurrentUser\My" -Password $securePassword $bytes = Get-Content '.\PnPServicePrincipalCert.pfx' -AsByteStream $encodedPfx = [System.Convert]::ToBase64String($bytes) $encodedPfx | Out-File -FilePath '.\PnPServicePrincipalCert.b64' -Encoding ascii - Take the .cer file and upload to certificates section in the service principal page.
 Figure 26 – Upload certificate
 - The script above also generates a .b64 file containing the Base64-encoded certificate. Keep this file open, as we’ll need to copy the Base64 content for the variable group.
- Remember the password you entered—we’ll also need it for the variable group.
- Grant the service principal access to the SharePoint document library by executing this code in PowerShell:
# Variables
$siteUrl = Read-Host "Enter the SharePoint Site's URL"
$pnpRockClientId = Read-Host "Enter the Client ID for PnP Rocks"
$clientId = Read-Host "Enter the Client ID for saving results to SharePoint"

# Connect to SharePoint Online using the current user's credentials
Connect-PnPOnline -Interactive -Url $siteUrl -ClientId $pnpRockClientId

# Grant the service principal full control permissions to the site
# Note: You can adjust to write permissions if you wish to restrict permissions further
Grant-PnPAzureADAppSitePermission -AppId $clientId -DisplayName "Service Principal" -Permissions FullControl

Write-Host "Access granted to the service principal"

# Disconnect the current user session
Disconnect-PnPOnline
If you’ve made this it far, congratulations on your SharePoint journey. It’s a nice platform, but setting up the security is tedious.
2. Set up the Variable Group.
- In your Azure DevOps project, navigate to the Pipelines->Library section.
 Figure 27 – Select Library
 - Select the “Add Variable Group” button.
 Figure 28 – Select + Variable Group
 - Create a variable group called “MYPBITMA-SP” and define the following variables:
- UPSTREAM_PIPELINE_ID – The pipeline ID copied in the prior steps.
- CERT_BASE64 – The Base64-encoded certificate created in the previous step. Make sure to enable the secret lock.
- CERT_PASSWORD – The password used to create the certificate. Make sure to enable the secret lock.
- SITE_URL – The site collection URL for your SharePoint site where results will be stored.
- LIBRARY_NAME – The name of the document library. If using the default Documents library, use “Shared Documents” as the value.
- TENANT_ID – The unique identifier for your Microsoft 365 tenant. This can be found by following these instructions.
- CLIENT_ID – The unique identifier for the service principal (not the PnPRocks one) created to save files to SharePoint.
3. Import Repository
- Navigate to Repos, click the breadcrumb menu dropdown (chevron), and select Import.
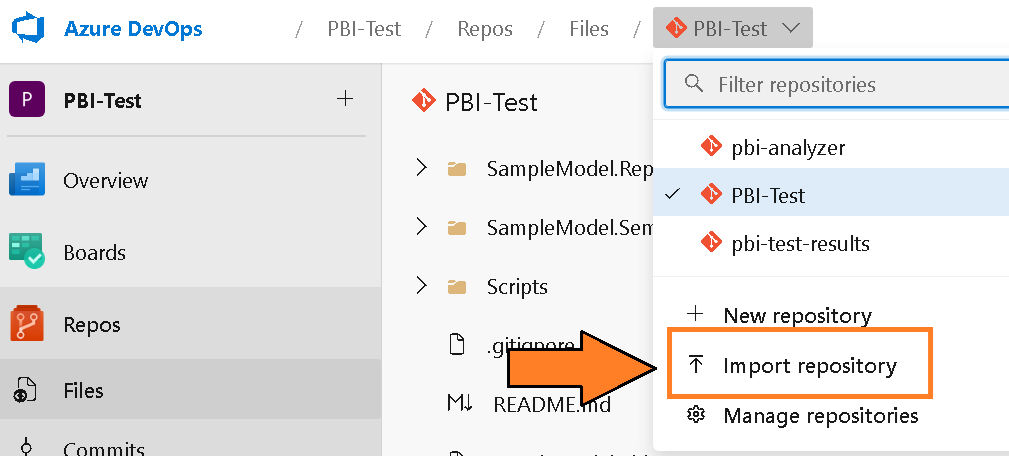 Figure 1 – Import Repository
 - The "Import a Git repository" window will appear. Enter https://github.com/kerski/pbi-teams-more-analytic-support in the Clone URL field and click Import.
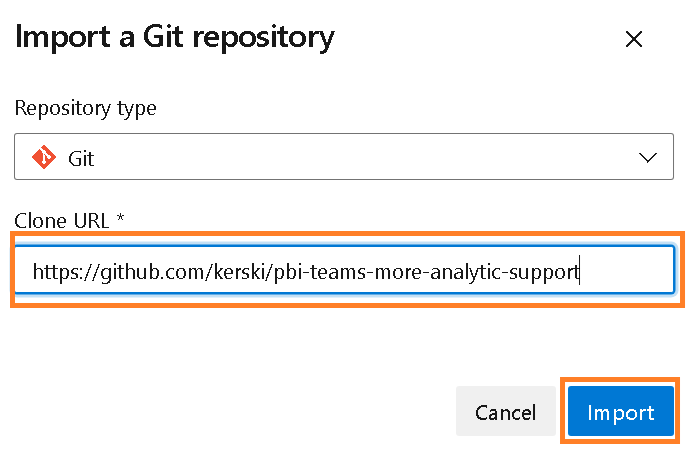 Figure 30 – Import a Git repository Once the Import button is selected, the import process will begin and could take a few minutes.
  Figure 31 – Example of importing Git repository from GitHub into Azure DevOps Once completed you’ll see the repository imported.
4. Setup Pipeline
Now we can set up the pipeline to run in Azure DevOps when artifacts are published.
- Navigate to the Pipelines screen.
 Figure 32 – Navigate to the Pipelines screen
 - Then select the “New Pipeline” button.
 Figure 33 – Select “New Pipeline” button
 - You will be presented with the question “Where is your code?”. Select the Azure Repos Git option.
 Figure 34 – Select the Azure Repos Git option
 - You will be prompted to select a repository. Select the repository name “pbi-teams-more-analytic support”.
 Figure 35 – Select a repository
 - You will be prompted to configure your pipeline. Choose the “Existing Azure Pipelines YAML file” option.
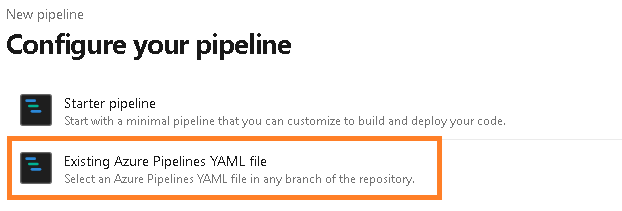 Figure 36 – Configure your pipeline
 - From the “Select an existing YAML file” select the file named “pbi-inspector-sp.yml”
 Figure 37 – Select pbi-inspector-sp.yml
 - Update the project names (line 10 and 33) to reference the project name.
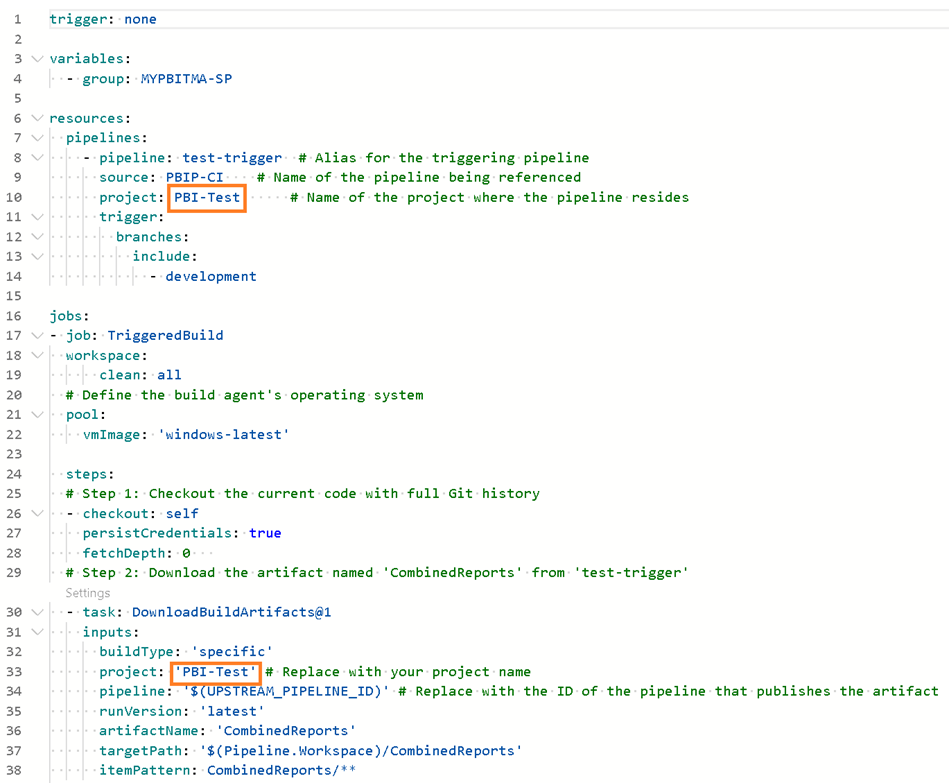 Figure 38 – Update project references
 - Then select the “Run” button and this will kick-off the pipeline.
 Figure 39 – Select “Run” button
 - You will be redirected to the pipeline screen and prompted to verify permissions. This happens because the variable group is a resource that requires explicit access for the pipeline. This security rule (a good one) helps prevent inadvertent access to sensitive variables. Click View to proceed.
 Figure 40 – Select the “View” button
 - You will be asked to permit the pipeline to access the variable group you created in the prior steps. Select the “Permit” button.
 Figure 41 – Select the “Permit” button
 - You may be prompted again to permit. Select the “Permit” button.
 Figure 42 – Select the “Permit” button again
 - This will officially kick off the pipeline and it will access the last published packages from the PBIP-CI pipeline.
 Figure 43 – Pipeline trigger
 - Once the pipeline completes, verify that there are no errors. You can also check the SharePoint site to confirm that PBI Inspector’s analysis has been saved to the designated document library.
 Figure 44 – Example of files save to SharePoint
 - I would recommend renaming the pipeline from the default to “pbi-inspector”. Instructions for renaming a pipeline can be followed .
The Fabric Fantasy
Pros:
- Storage – Setting up OneLake to accept files from Azure DevOps involves fewer steps compared to SharePoint.
- Easy extraction – Storing results in OneLake simplifies processing, aggregating, and creating metrics. Additionally, results can be accessed in near real-time.
Cons:
- Limited access – Not everyone has access to Fabric due to financial or tenant availability constraints.
Prerequisites:
You have an existing Lakehouse created. Instructions can be found at this link.
You have a service principal. If you are using a service principal you will need to make sure the Power BI tenant allows service principals to use the Fabric APIs. The service principal will need at least the Member role to the workspace.
Steps:
1. Capture Lakehouse Variables
We’ll need the URL information for accessing the Lakehouse folder to save the results, so here are the steps to do that:
- Navigate to Lakehouse in the Fabric workspace.
- Access the Files’ properties by hovering over the Files label, select the option ‘…’ and select Properties.
- Copy the URL to your local machine temporarily in Notepad.
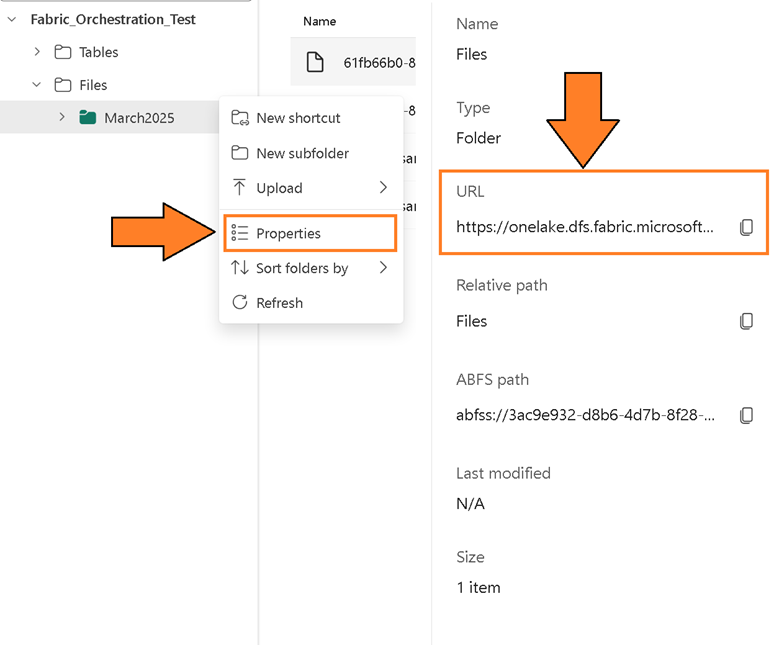 Figure 45 – Copy the URL for use later
2. Set up the Variable Group.
- In your Azure DevOps project, navigate to the Pipelines->Library section.
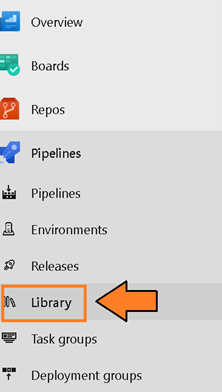 Figure 46 – Select Library
 - Select the “Add Variable Group” button.
 Figure 47 – Select + Variable Group
 - Create a variable group called “MYPBITMA-ONELAKE” and create the following variables:
- UPSTREAM_PIPELINE_ID – This is the pipeline ID copied in the prior steps.
- TENANT_ID – This is the unique identifier for your Microsoft 365 tenant. This can be found by using these instructions.
- CLIENT_ID – This is the unique identifier for the service principal you create to save files to OneLake.
- CLIENT_SECRET – This is the “password” for the service principal so you should set the lock icon, so it’s encrypted and not visible in plain text.
- ONELAKE_ENDPOINT – This is the URL you copied in the prior step.
3. Import Repository
- Navigate to Repos, click the breadcrumb menu dropdown (chevron), and select Import.
 Figure 48 – Import repository
 - The “Import a Git repository” window should appear and enter “https://github.com/kerski/pbi-teams-more-analytic-support” into the Clone URL field and select the import option.
 Figure 49 – Import a Git repository Once the Import button is selected, the import process will begin and could take a few minutes.
  Figure 50 – Example of importing Git repository from GitHub into Azure DevOps
Once completed you’ll see the repository imported.
4. Setup Pipeline
Now we can set up the pipeline to run in Azure DevOps when artifacts are published.
- Navigate to the Pipelines screen.
 Figure 51 – Navigate to the Pipelines screen
 - Then select the “New Pipeline” button.
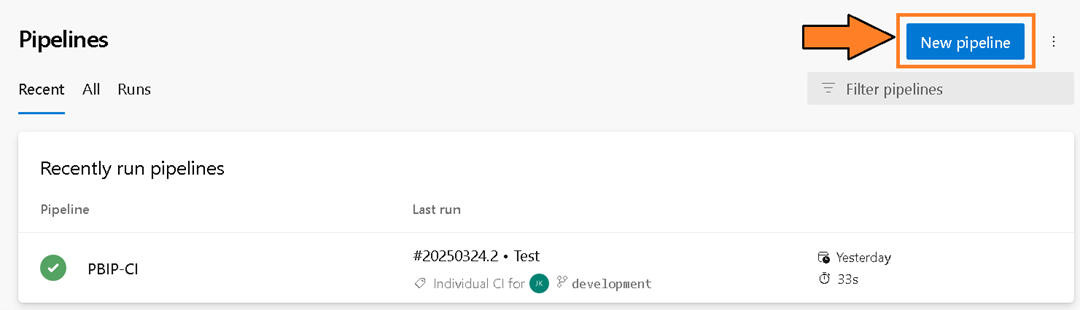 Figure 52 – Select the “New pipeline” button
 - You will be presented with the question “Where is your code?”. Select the Azure Repos Git option.
 Figure 53 – Select the Azure Repos Git option
 - You will be prompted to select a repository. Select the repository name “pbi-teams-more-analytic support”.
 Figure 54 – Select a repository
 - You will be prompted to configure your pipeline. Choose the “Existing Azure Pipelines YAML file” option.
 Figure 55 – Configure your pipeline
 - From the “Select an existing YAML file” select the file named “pbi-inspector-onelake.yml”
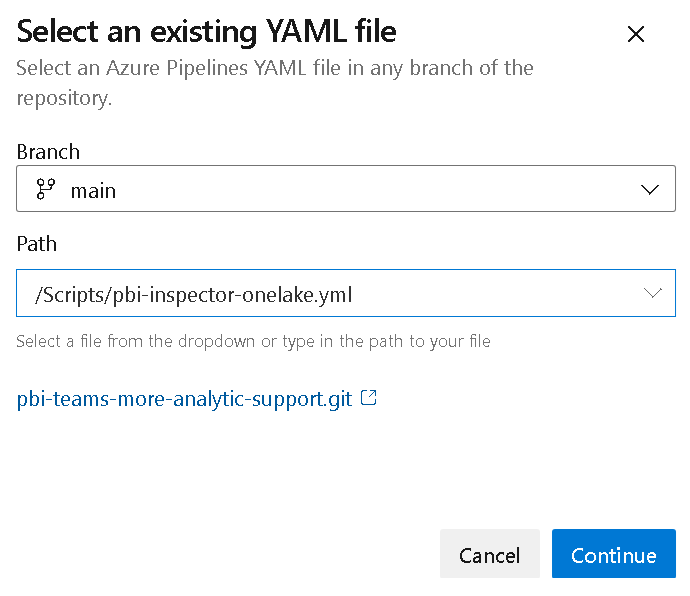 Figure 56 – Select pbi-inspector-onelake.yml
 - Update the project names (line 10 and 33) to reference the project name.
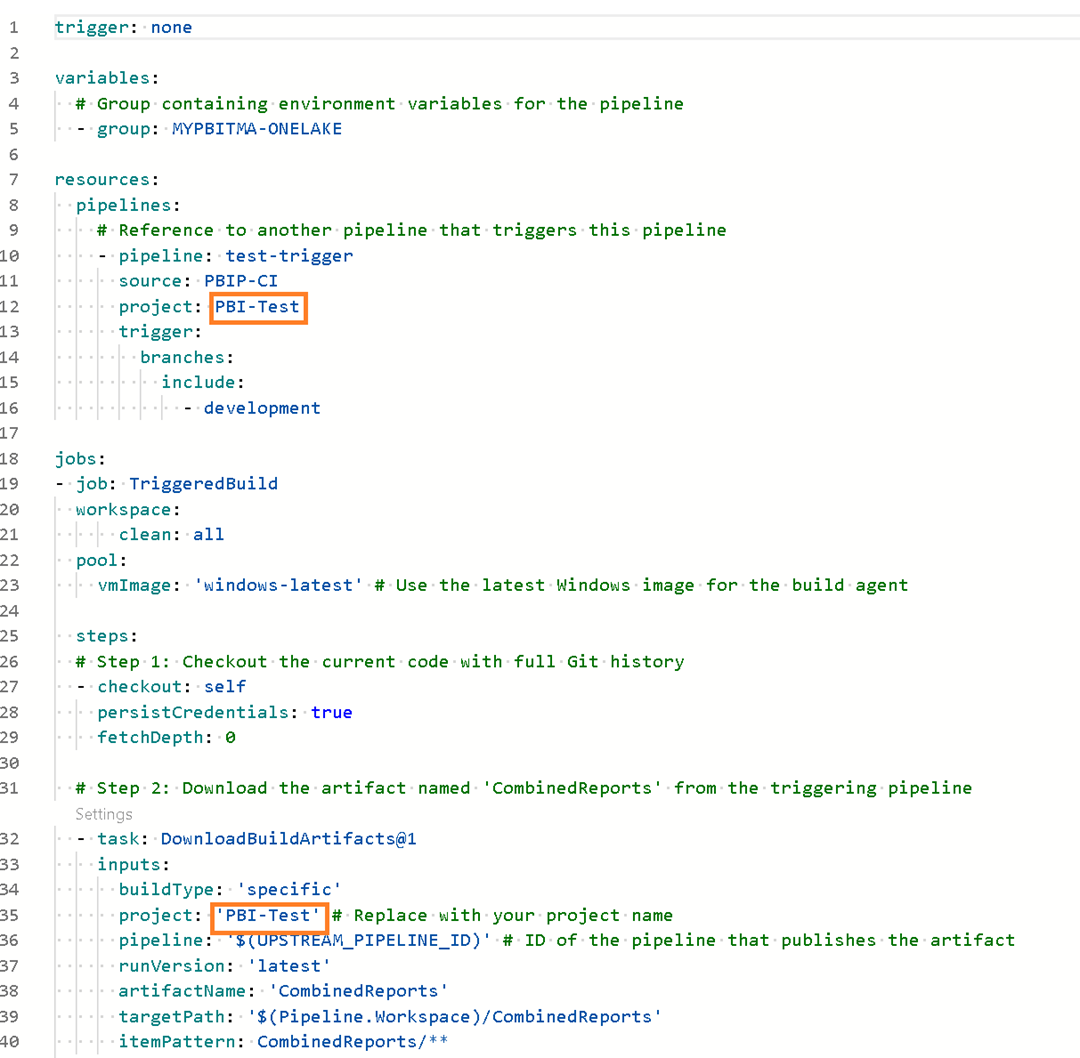 Figure 57 – Update project references
 - Then select the “Run” button and this will kick-off the pipeline.
 Figure 58 – Select “Run” Button
 - You will be redirected to the pipeline screen and prompted to verify permissions. This is because the variable group is a resource that requires explicit access for the pipeline. This security measure (a good one) prevents inadvertent access to variables in the group. Click View to proceed.
 Figure 59 – Select the “View” button
 - You will be asked to permit the pipeline to access the variable group you created in the prior steps. Select the “Permit” button.
 Figure 60 – Select the “Permit” button
 - You may be prompted again to permit. Select the “Permit” button.
 Figure 61 – Select the “Permit” button again
 - This will officially kick off the pipeline and it will access the last published packages from the PBIP-CI pipeline.
 Figure 62 – Pipeline trigger
 - When the pipeline completes, verify there are no errors, and you can check the Lakehouse if PBI Inspector’s analysis has been saved to the root folder.
 Figure 64 – Example of files saved to OneLake
 - I would recommend renaming the pipeline from the default to “pbi-inspector”. Instructions for renaming a pipeline can be followed at this link.
Conclusion
How was the adventure? Hopefully, this guide helped you successfully save your PBI Inspector analysis results. Now, you’re ready for the next chapter in this series—Semantic Model – Static Analysis. Stay tuned…
As always, let me know your thoughts on LinkedIn or Twitter/X.